We’ve been trying to upgrade our Citrix PVS tools to version 7.13 and had some issues. I need to reverse image so I can remove the software without dealing with the in-place upgrade procedure. So I decided this would be a good time to update my reverse imaging process. This time I will only be using native tools built into the OS. With that, this is my new procedure for reverse imaging. It’s much faster and easier than my last process, but it does have a dependency. You must be running Windows 2012 or greater so that dism.exe is a part of the OS. This reverse imaging process is VMWare specific but the principals should apply to all hypervisors. The overview of the process is as follows:
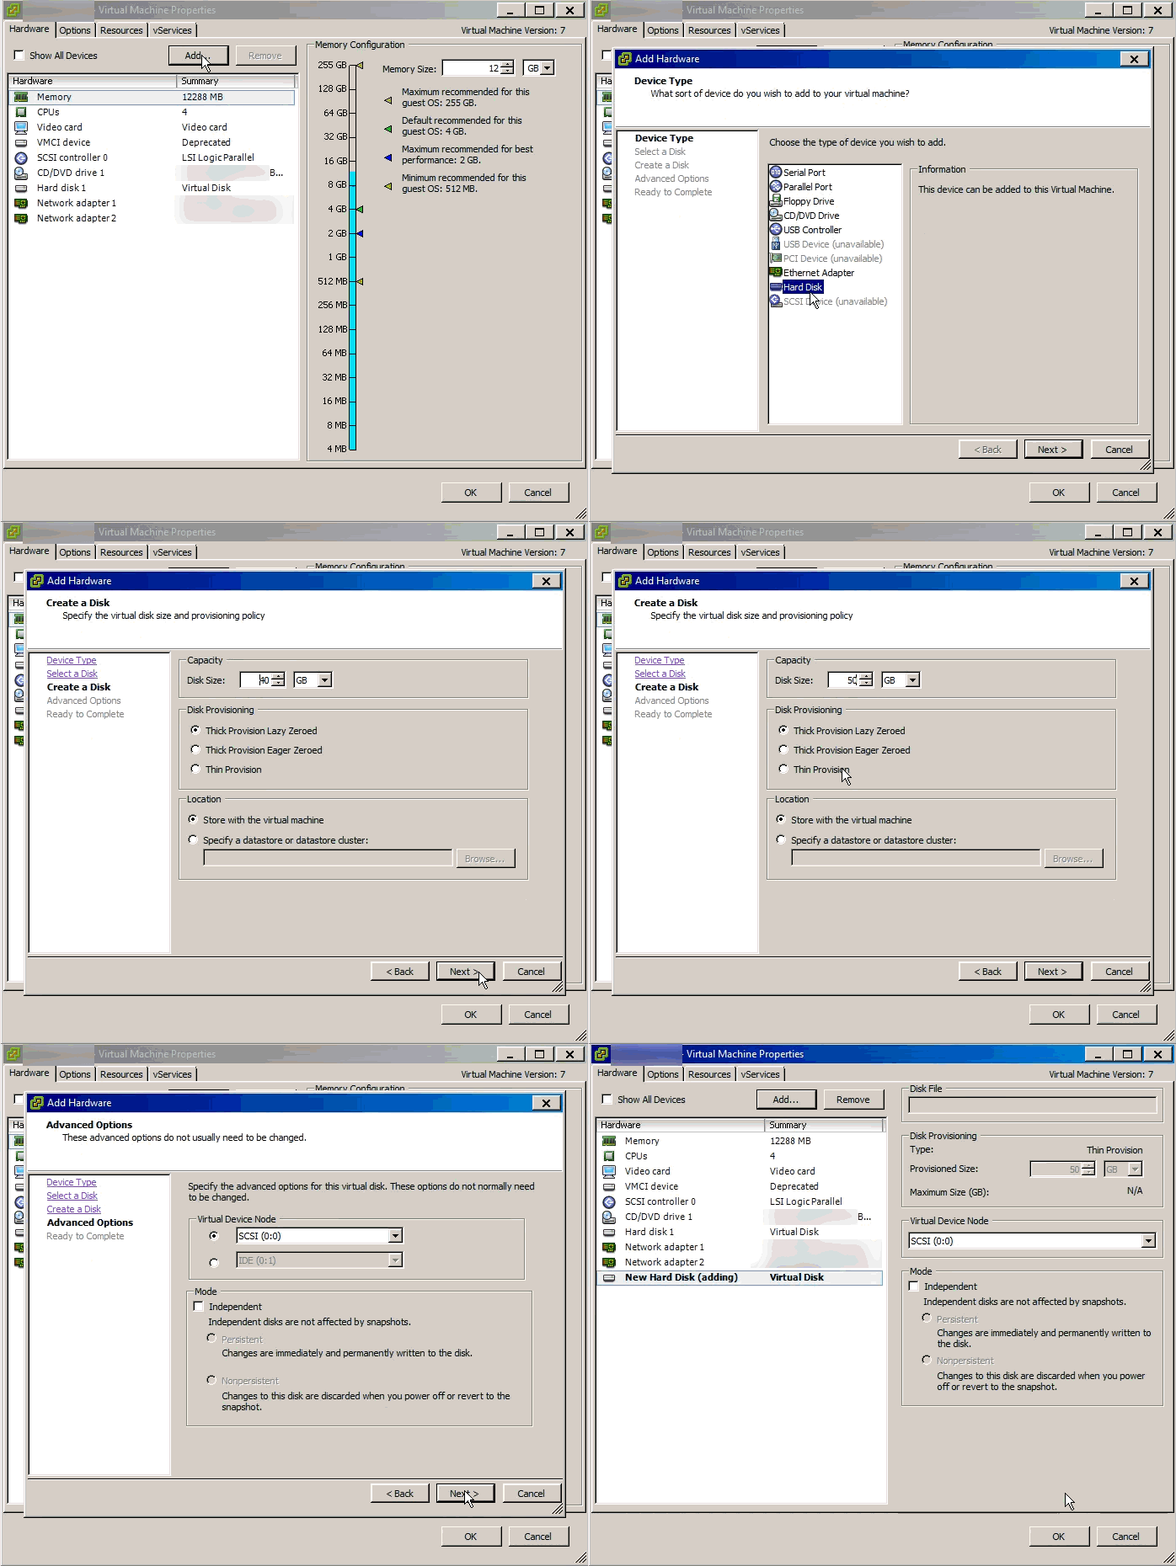
Create a local hard drive on a ‘build’ server that your vDisk will be based off of.
Attach that disk to the PVS server
Image vDisk to local disk
Boot local disk, manipulate as needed
Image local disk back
- Create a new hard disk on your ‘build’ VM that we will use as the staging for the vDisk you want to reimage

- Attach the newly created disk to your PVS server <div style="width: 940px;" class="wp-video">
</div> - Setup the disks on the PVS server. In my example, the G: drive is a mounted VHDX of the Citrix vDisk. I’m using DISM to capture an image file of this disk to a wim that I will apply to the local disk created in step 1. You will need to create a partition on the disk you made in step 1 and set it as active (if this is a MBR disk). Unfortunately, DISM does not do disk to disk imaging so this intermediary step is required. In my video here, the E: drive is the local disk that belongs to my target ‘build’ server. In addition, you must fix the BCD store as it will point to the original partition, not your new target partition.
The BCD commands are:</p>bcdedit /store bcd /set {bootmgr} device partition=e: bcdedit /store bcd /set {default} device partition=e: bcdedit /store bcd /set {default} osdevice partition=e
You will need to replace "partition=E:" with your drive letter of the LOCAL disk.

<div style="width: 1024px;" class="wp-video">
  <video class="wp-video-shortcode" id="video-2449-29" width="1024" height="768" preload="metadata" controls="controls"><source type="video/mp4" src="/wp-content/uploads/2017/06/2017-06-26_11-15-14.mp4?_=29" /><a href="/wp-content/uploads/2017/06/2017-06-26_11-15-14.mp4">/wp-content/uploads/2017/06/2017-06-26_11-15-14.mp4</a></video>
</div>
- Remove your hard disk from the PVS virtual machine without deleting it. Ensure the disk is attached to your BUILD target device. If you are booting up your BUILD target device from an ISO or PXE you may need to disable those features so that it boots from the hard disk. I also disconnect the network from the virtual machine because we will need to reset the computer account with AD.
- To reset the computer account with AD, you need to login to the system. The easiest method is if you know the local administrator password, log in with that and “rejoin” the domain. If not, disconnect the network then logon with an account that has recently logged onto the server. Cached credentials should be able to pass you through. Once you are in, connect the network and rejoin the domain. You can typically “rejoin” by changing the domain name to the NETBIOS name, or the reverse if the NETBIOS name is present <div style="width: 1130px;" class="wp-video">
</div>
At this point you can do whatever work is required.</li>

  * Once you are done with whatever work you need to do, set the target device to boot from <span style="text-decoration: underline;"><strong>hard disk</strong></span>, but keep your vDisk set as an option.  This will attach the vDisk on boot as a secondary drive.  This will allow us to image back to it.  You need to ensure this vDisk is in <span style="text-decoration: underline;"><strong>PRIVATE mode</strong></span> OR has a <span style="text-decoration: underline;"><strong>Maintenance</strong> </span>version.  This will set the vDisk to a Read/Write mode.   <img class="aligncenter size-full wp-image-2461" src="/wp-content/uploads/2017/06/bootfrom_hdd.png" alt="" width="491" height="432" srcset="/wp-content/uploads/2017/06/bootfrom_hdd.png 491w, /wp-content/uploads/2017/06/bootfrom_hdd-300x264.png 300w" sizes="(max-width: 491px) 100vw, 491px" />   <img class="aligncenter size-large wp-image-2462" src="/wp-content/uploads/2017/06/keepvdiskchoice.png" alt="" width="492" height="429" srcset="/wp-content/uploads/2017/06/keepvdiskchoice.png 492w, /wp-content/uploads/2017/06/keepvdiskchoice-300x262.png 300w" sizes="(max-width: 492px) 100vw, 492px" /> If you have your WRITE drive attached, you will need to ensure your local system disk is the LAST disk in the order for your VM.  The PVS boot loader, when set to boot from hard disk, seems to try and boot the LAST disk it detects.   <img class="aligncenter size-full wp-image-2465" src="/wp-content/uploads/2017/06/OS-drive-1.png" alt="" width="698" height="624" srcset="/wp-content/uploads/2017/06/OS-drive-1.png 698w, /wp-content/uploads/2017/06/OS-drive-1-300x268.png 300w" sizes="(max-width: 698px) 100vw, 698px" />   <img class="aligncenter size-large wp-image-2464" src="/wp-content/uploads/2017/06/write-cache-drive.png" alt="" width="700" height="624" srcset="/wp-content/uploads/2017/06/write-cache-drive.png 700w, /wp-content/uploads/2017/06/write-cache-drive-300x267.png 300w" sizes="(max-width: 700px) 100vw, 700px" />
    Checking the PVS Status Tray shows you've booted from a local hard drive.   <img class="aligncenter size-full wp-image-2466" src="/wp-content/uploads/2017/06/localHddBoot.png" alt="" width="455" height="481" srcset="/wp-content/uploads/2017/06/localHddBoot.png 455w, /wp-content/uploads/2017/06/localHddBoot-284x300.png 284w" sizes="(max-width: 455px) 100vw, 455px" />   <img class="aligncenter size-full wp-image-2467" src="/wp-content/uploads/2017/06/CitrixVdiskDriveLetter.png" alt="" width="592" height="339" srcset="/wp-content/uploads/2017/06/CitrixVdiskDriveLetter.png 592w, /wp-content/uploads/2017/06/CitrixVdiskDriveLetter-300x172.png 300w" sizes="(max-width: 592px) 100vw, 592px" />
    Something you will need to check and validate is that the Hard Disk of the Citrix vDisk is NOT the drive letter of your write cache (if you find you cannot attach a write cache).  The reason is you have probably redirected the page file, event logs or whatever and if the Citrix vDisk occupies that drive letter you will not be able to image to it because it will be in use.
  * To image back open the Imaging Wizard:   <img class="aligncenter size-full wp-image-2468" src="/wp-content/uploads/2017/06/ImagingWizard.png" alt="" width="258" height="417" srcset="/wp-content/uploads/2017/06/ImagingWizard.png 258w, /wp-content/uploads/2017/06/ImagingWizard-186x300.png 186w" sizes="(max-width: 258px) 100vw, 258px" />
    And go through the imaging process.</p> <div style="width: 620px;" class="wp-video">
      <video class="wp-video-shortcode" id="video-2449-31" width="620" height="436" preload="metadata" controls="controls"><source type="video/mp4" src="/wp-content/uploads/2017/06/ImagingWizard.mp4?_=31" /><a href="/wp-content/uploads/2017/06/ImagingWizard.mp4">/wp-content/uploads/2017/06/ImagingWizard.mp4</a></video>
    </div>

    I prefer to image to the vDisk volume (as seen in this process).</li>

      * Done!  Set the device to boot via the vDisk as opposed to Hard Disk, delete the local OS disk, boot up your vDisk and run any scripts to 'finalize' your image.</ol>
    <!-- AddThis Advanced Settings generic via filter on the_content -->

    <!-- AddThis Share Buttons generic via filter on the_content -->